Finishing Tooled Leather

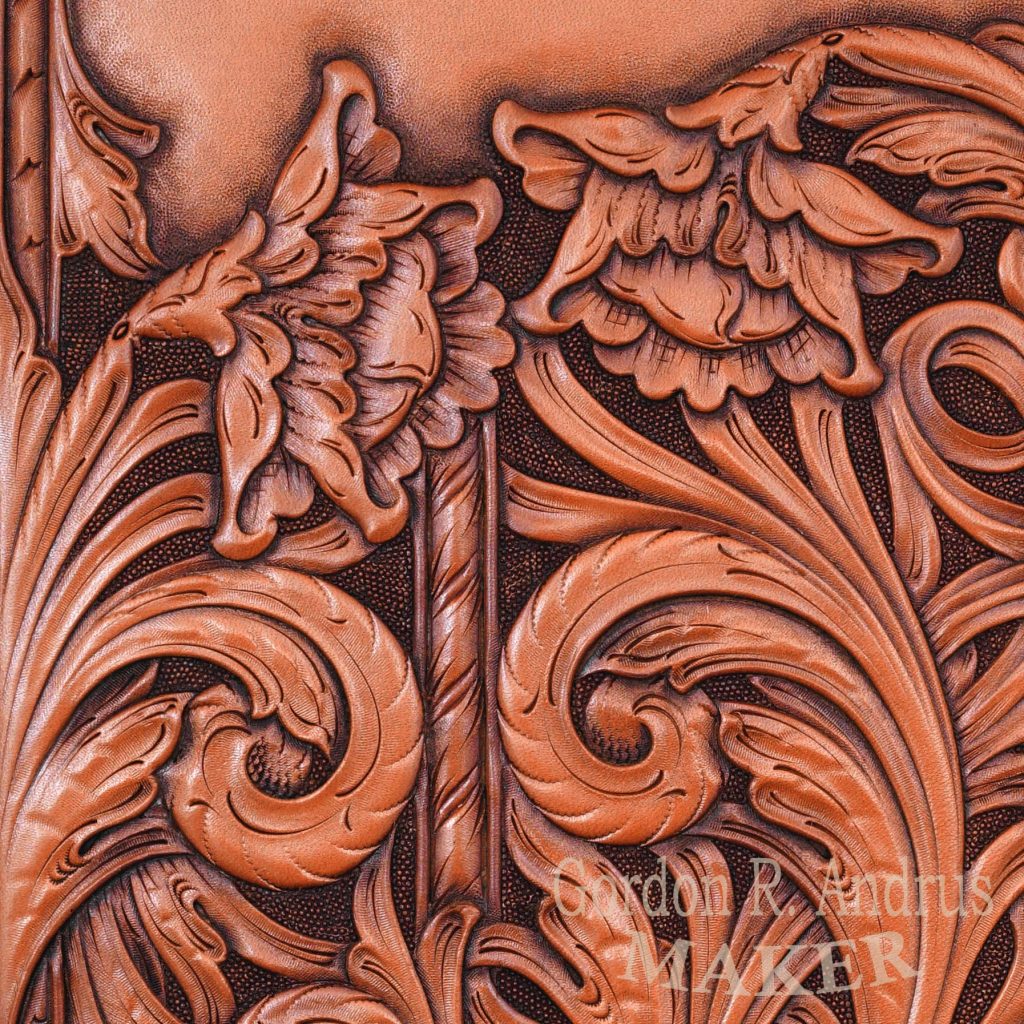
I recently had a friend from Slovenia email and ask about my method for finishing my tooled leather.  I’ve wanted to take the time to write this information and answering that email has given me the perfect opportunity.

I want to share this here to thank the followers of this blog and especially all my customers.  Please read with my hope that you will find this useful in your work…

My process for finishing tooled leather is as follows.


When tooling has dried, apply Neatsfoot, or olive oil with a piece of saddle shearling fleece sheepskin (used to line western saddles) which has been trimmed to about 15mm and roughly 70mm x 100mm.  I apply the oil with one half of the fleece as evenly as I can in a circular motion and then immediately use the un-soaked half, or another piece of fleece, to wipe and even out the oil application.  You can let the work sit for a brief time and allow the oil to penetrate somewhat.  You don’t have to leave it overnight as some people claim.


I use nitrocellulose lacquer that is made for finishing guitars to seal the surface and provide a resist for the antique (Fiebing’s, I like the tan color for most things, Dark Brown for brown colored skirting).  Use a piece of fleece for this lacquer also.  It will take some practice to get this mastered.  You don’t want it to be thickly applied.  I do the same with lacquer as with oil, wiping it with a cleaner piece of fleece before it can start to dry.  Lacquer dries extremely fast and will become messy and sticky if you let it build up.  You don’t want to be able to see a coat of lacquer on the leather the way you would with paint or varnish on wood.  This film of lacquer will be dry in minutes, and you can move straight on to apply the antique paste.  Again, no waiting overnight as some would tell you.  Lacquer is not very flexible and will crack if it is applied to thick.  If you’ve seen an old guitar with a crazed/cracked finish you will understand what I mean.


I thin my antique paste to the consistency of thick cream.  It is left thick enough that it won’t run off from a paint brush.  I use mineral spirits, a paint thinner here in the US known as Naphtha.  Any type of mineral spirit paint thinner will work.  I apply the antique with a natural boar bristle sash type of round paint brush. These I believe are more common in Europe.  With this type of brush, I can pounce, or push the antique down into all the cuts and details.  If the paste is left as thick as it comes from the manufacturer it will not flow into the work the way I want it to or be able to be cleaned off sufficiently.  Work quickly, and on most pieces bigger than a wallet it is good to work in sections, so it won’t start to dry and be more difficult to wipe off.


When the antique has been evenly spread and worked into the tooling, I first wipe the excess off with paper towel, then follow immediately with a larger piece of fleece which is left at its full length.  The idea is to remove as much of the paste as possible.  This piece of fleece will become filled with the antique paste and must be replaced as it fails to remove the paste from the details.  I later trim this fleece to be able to use it for other applications such as the Fiebing’s Bagcoat that I use as the final topcoat.


Bagcoat and Tancoat are very similar.  Bagcoat is thinner, and I prefer the way it looks as well as the way it goes on.  Tancoat can be used.  I apply this topcoat with a piece of fleece also, spreading it with a piece that has been trimmed, and then wiping it off with a full thickness piece to create the thinnest film possible.  These products leave a beautiful lustrous result; however, they are not durable or water resistant.  If used by themselves without the lacquer the work will spot if water is dripped on it.  The smallest drop will cause water spotting.  This does not happen if lacquer is applied first.


Thanks for checking in, and please leave comments and questions so I can get an idea of the things you folks would like to see covered in future posts on this blog

Gordon-

New Flame Colored Stainless Steel Swivel Knives

How to order

-UPDATE- These are now selling for $220.00.

I’m making these new knives personally one at a time.  They will be made to order with sizing specifics determined by you the customer.  They are flame-colored stainless steel. The knurling has the best grip of any knives I’ve ever used, especially the ones with the annular rings. The yoke has two bearings for stability and is exceptionally smooth. My blades are made of D2 blade steel. To order one I just need an email address, shipping address, and phone number, to send an invoice That you will be able to securely pay online.  Email to scsaddle@yahoo.com

Please specify the barrel length and diameter that you would like for your knife. The three in these pictures are 7/16″. Other choices are, 3/8″, 1/2″, 9/16″, and 5/8″.

To determine the length of the barrel that you want, study the picture to the right.  You need to measure your current knife from the yoke saddle to the end of the barrel without a blade.  Then, decide how much adjustment you want the new knife to have beyond the top end of the barrel.  The knife can be made with the barrel top right below the yoke, or you can choose to have some adjustment room to set it shorter if needed.  All knives are able to be set longer than the chosen barrel length.

To order a knife I specifically need the barrel length that you decide upon and the barrel diameter.

The picture at the far right illustrates a method that has proven particularly good for determining a swivel knife’s length based on hand size.  It might be a good idea to try this with a knife that you currently use before measuring for your new knife.

I’m very excited about these unique knives and appreciate the opportunity to make them available to you.
Gordon

Knife length

From my book “Harmony and Life in Leather

“Understand the swivel knife and the ergo­nomics of its use.”

The knife, in the picture to the right, has been adjusted using the above method of finding the length from your hand size.  It may be longer than many folks are accustomed to. Also, note that the fingers and side of the hand are up, off of the work surface, as are the forearm and elbow, freeing up the joints of the arm to move. The length of the knife is such that a natural stress is set up, in the index finger, which automatically pushes the knife downward into the leather. If you have always adjusted your knife to be shorter than this, you may think that this feels awkward. In fact, people who make this adjustment gain a great deal more control. With your hand and arm free of the bench top, you are free to move all of the linkages in your arm, to make long, flowing cuts that taper over their entire length.

Drawing the Basic Acanthus Leaf

This post is excerpted from my book, “Drawing Floral Patterns For Leather Tooling”

The following drawings illustrate
the skeletal lines within the various
shapes that we draw, starting with the
most basic leaf and progressing to complex
structures like acanthus leaves, scrolls,
and flowers.
The simple leaf in the drawing here
shows how the leaf tapers to blend into
the skeleton. This is the way that skeletal
lines work in a nicely flowing layout.
They are in the center of the various structures
in the drawing and keep things moving
smoothly.Skeletal-Leaf-development-pg-1
In the next, more complex leaf there
are two skeletal lines, and in the next leaf
there are three. The third line descends
from the lobe that is formed by the S curve
at the top. Knowing that the skeletal line
is there, where the swelling of this lobe is
at its fullest, we are able to keep things
balanced.
As will be seen in the layouts presented
later, most of these lines don’t get
drawn in when drawing a layout pattern.
However it is important to know that they
are there. These lines form the composition
beneath the big picture.

For the purpose of this blog post I want to make a suggestion that you get a tracing pad, print out these images and trace the lines.  -But-  When doing this I suggest that you concentrate on the dimensions of each part relative to the other parts.  Try tracing the little thumb, or simple leaf and then turn the tracing to see how many times its length will go into the the S curve at the top of the combined leaf.  Concentrate on the size and sweep of the curves in the S curve.  The curve at the tip is smaller than the curve that connects the thumb leaf.  While tracing look to see how each line relates to the skeletal lines.

The point is, it is not enough to make the right number of bumps, curves and tapers.  Each part needs to be in the right proportion to every other part.

It is perfectly acceptable to trace like this for the purpose of learning how it feels to draw certain shapes.  If you practice enough you will develop muscle memory for the shapes.  If you don’t gain muscle memory you simply won’t be able to draw floral designs.  So develop the discipline to practice when you are not trying to work on an actual project.

When you can draw the basic shapes that you want to use in your patterns, then you will be ready to take on the much more complex task of putting them together in a layout.

Leaf-development-post