Oooops Fixed

I should have done this months ago…

The problems in the first small printing of this book, “Harmony and Life in Leather”, have been fixed.  The errors were changed right away and other than the first  twenty or so books they have been going out with no missing images or text ever since.  The books are available here.  They can also be purchased from the Leather Crafters and Saddlers Journal, and will soon be available from Barry King at his website.

Harmony and Life cover 2 Altrnt

Oooops!

I want to thank all those who have recently purchased my new book, Harmony and Life in Leather.  With the publication I have received notes from some of you which pointed out a couple of images that were left out of the first printing along with a couple of hanging sentences.  I sent some of you an email with a new edited pdf of the pages that were affected, and have heard back that some were unable to open the files.  I suggested that I could load the pages on this blog as images in a gallery that could be downloaded or saved as screenshots.  This met with approval and seems like the best solution.  Three pages of the book were affected.  In a book however, even the simplest additions can have a big effect on the layout.  The result is that I have placed six pages in this gallery to make sure I have covered everything that was needed.

To view the images you may need to open this post in its own browser page by clicking on the title (Oooops!) above.  Feel free to copy and download these images.  I'm sorry for the inconvenience, and appreciate the opportunity to share with you all.

Gordon Andrus  

Drawing the Basic Acanthus Leaf

This post is excerpted from my book, “Drawing Floral Patterns For Leather Tooling”

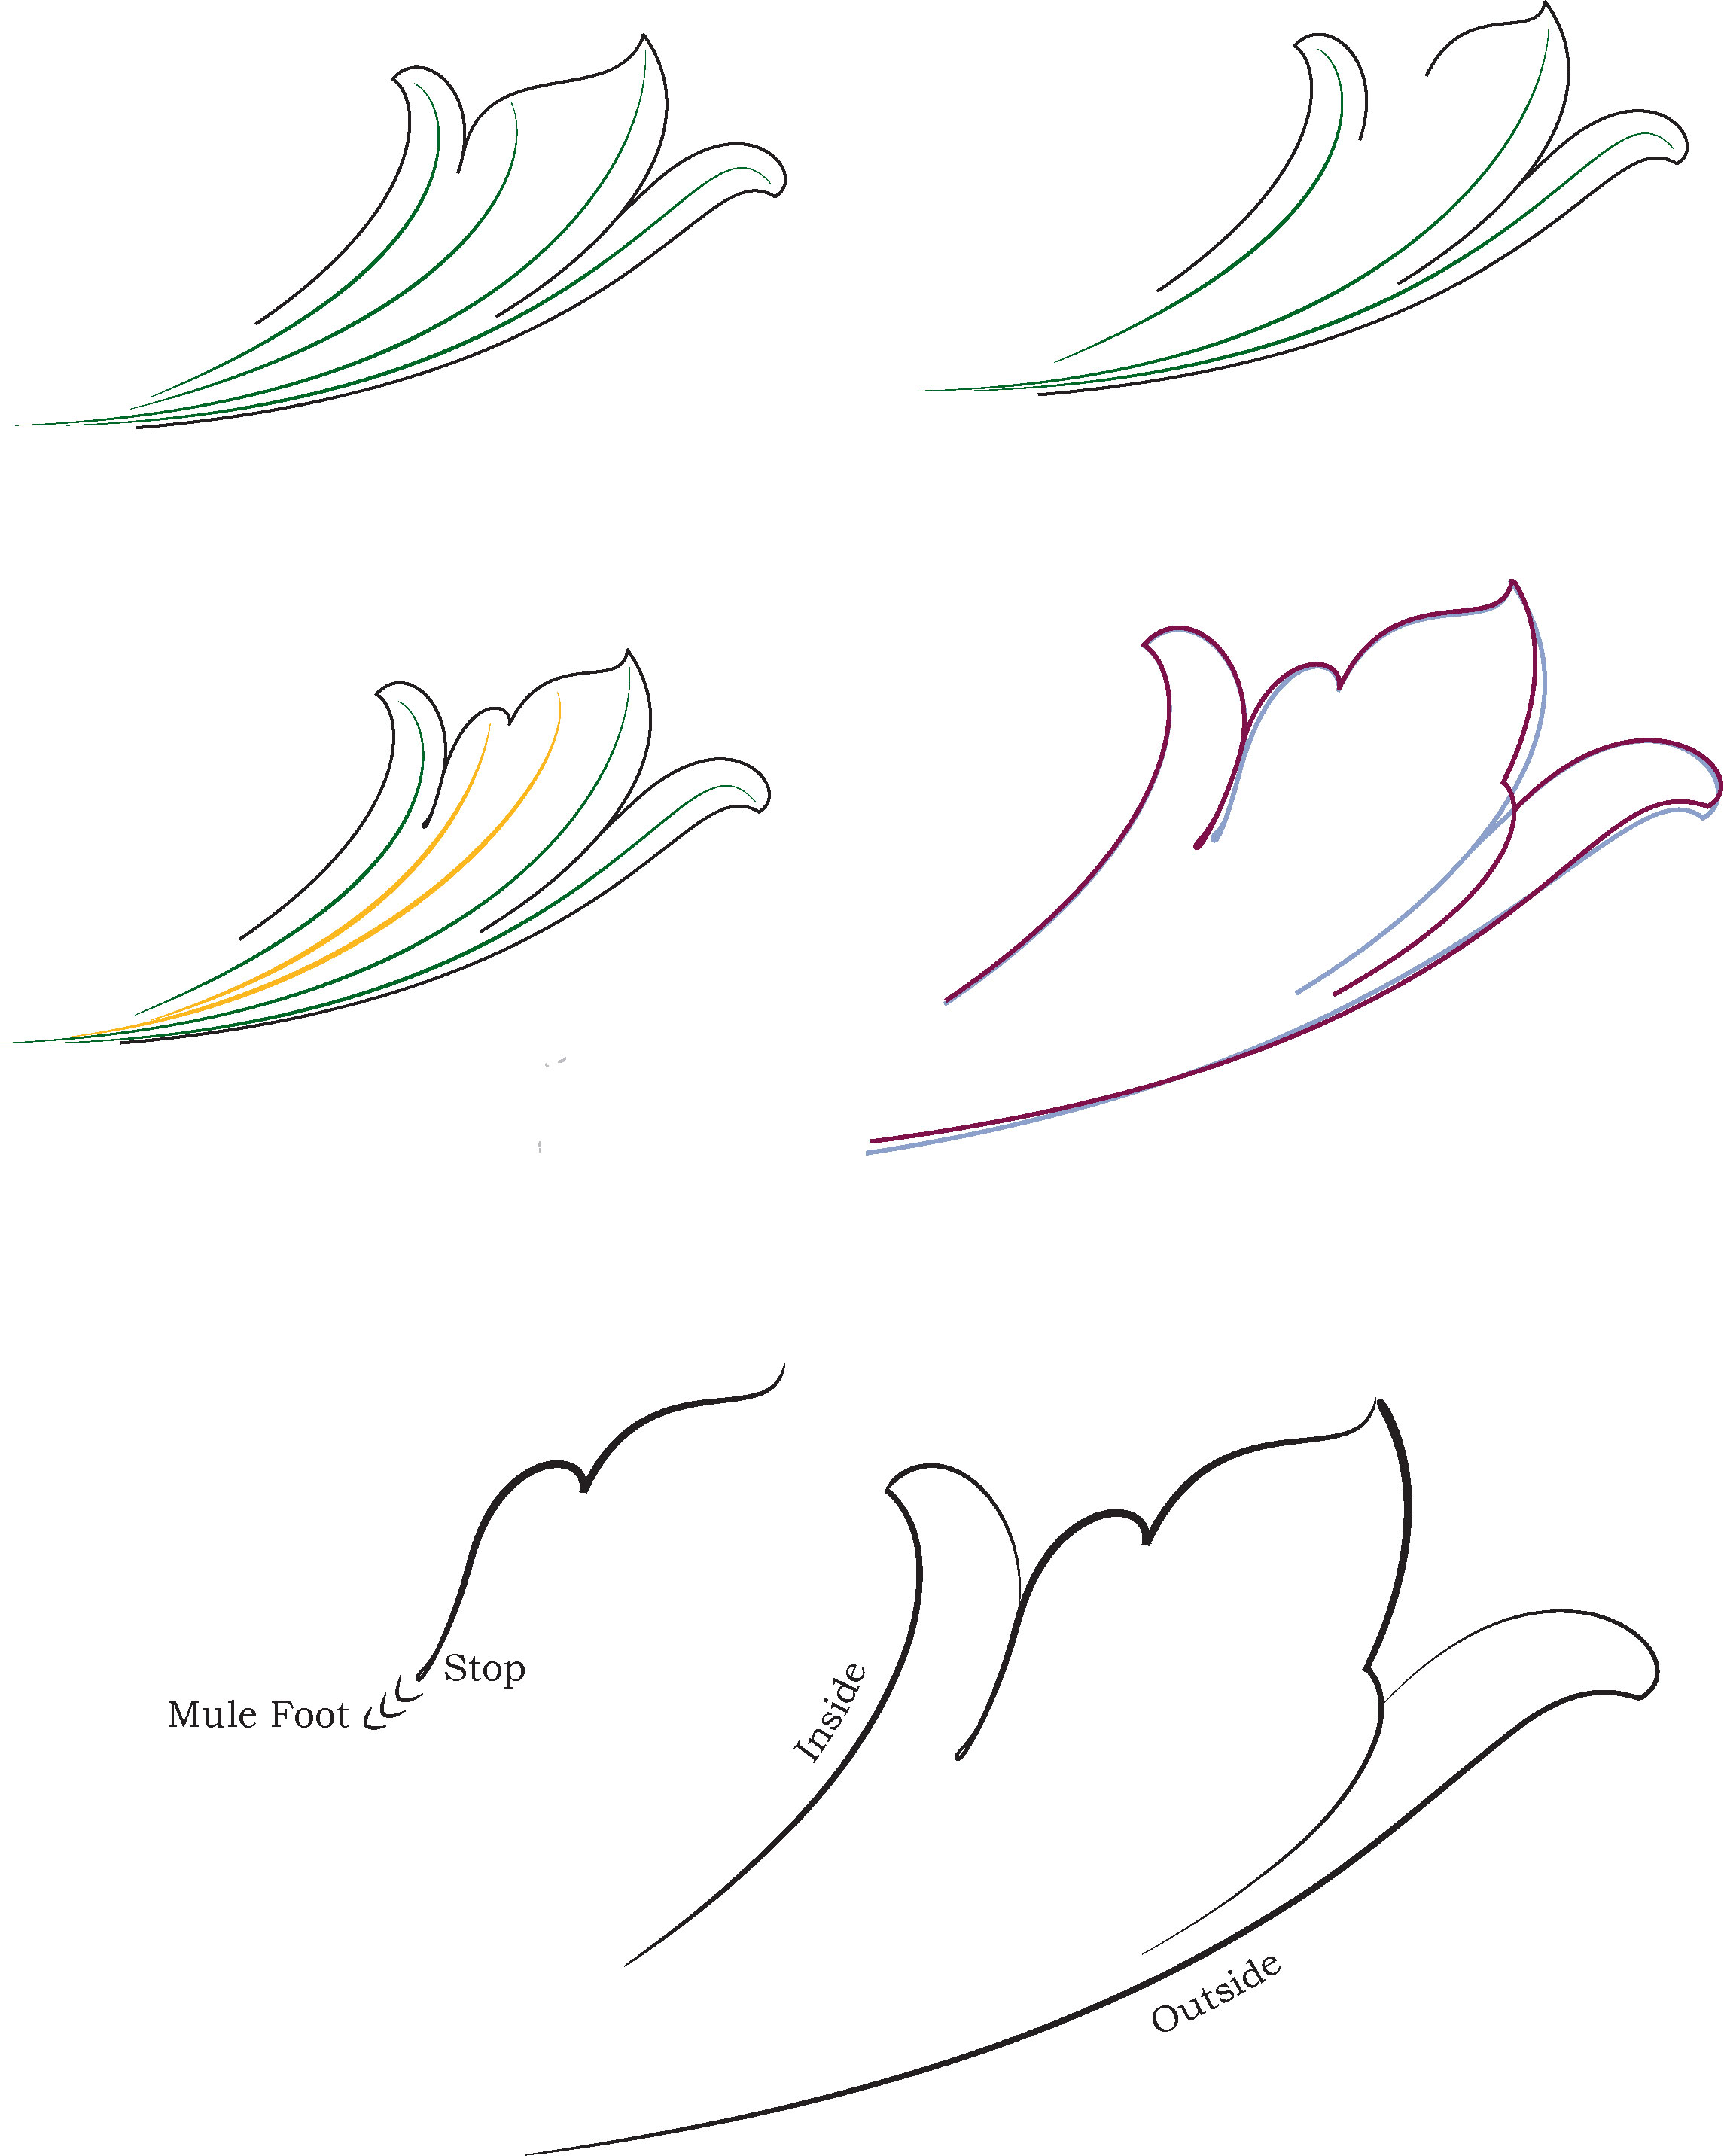
The following drawings illustrate
the skeletal lines within the various
shapes that we draw, starting with the
most basic leaf and progressing to complex
structures like acanthus leaves, scrolls,
and flowers.
The simple leaf in the drawing here
shows how the leaf tapers to blend into
the skeleton. This is the way that skeletal
lines work in a nicely flowing layout.
They are in the center of the various structures
in the drawing and keep things moving
smoothly.Skeletal-Leaf-development-pg-1
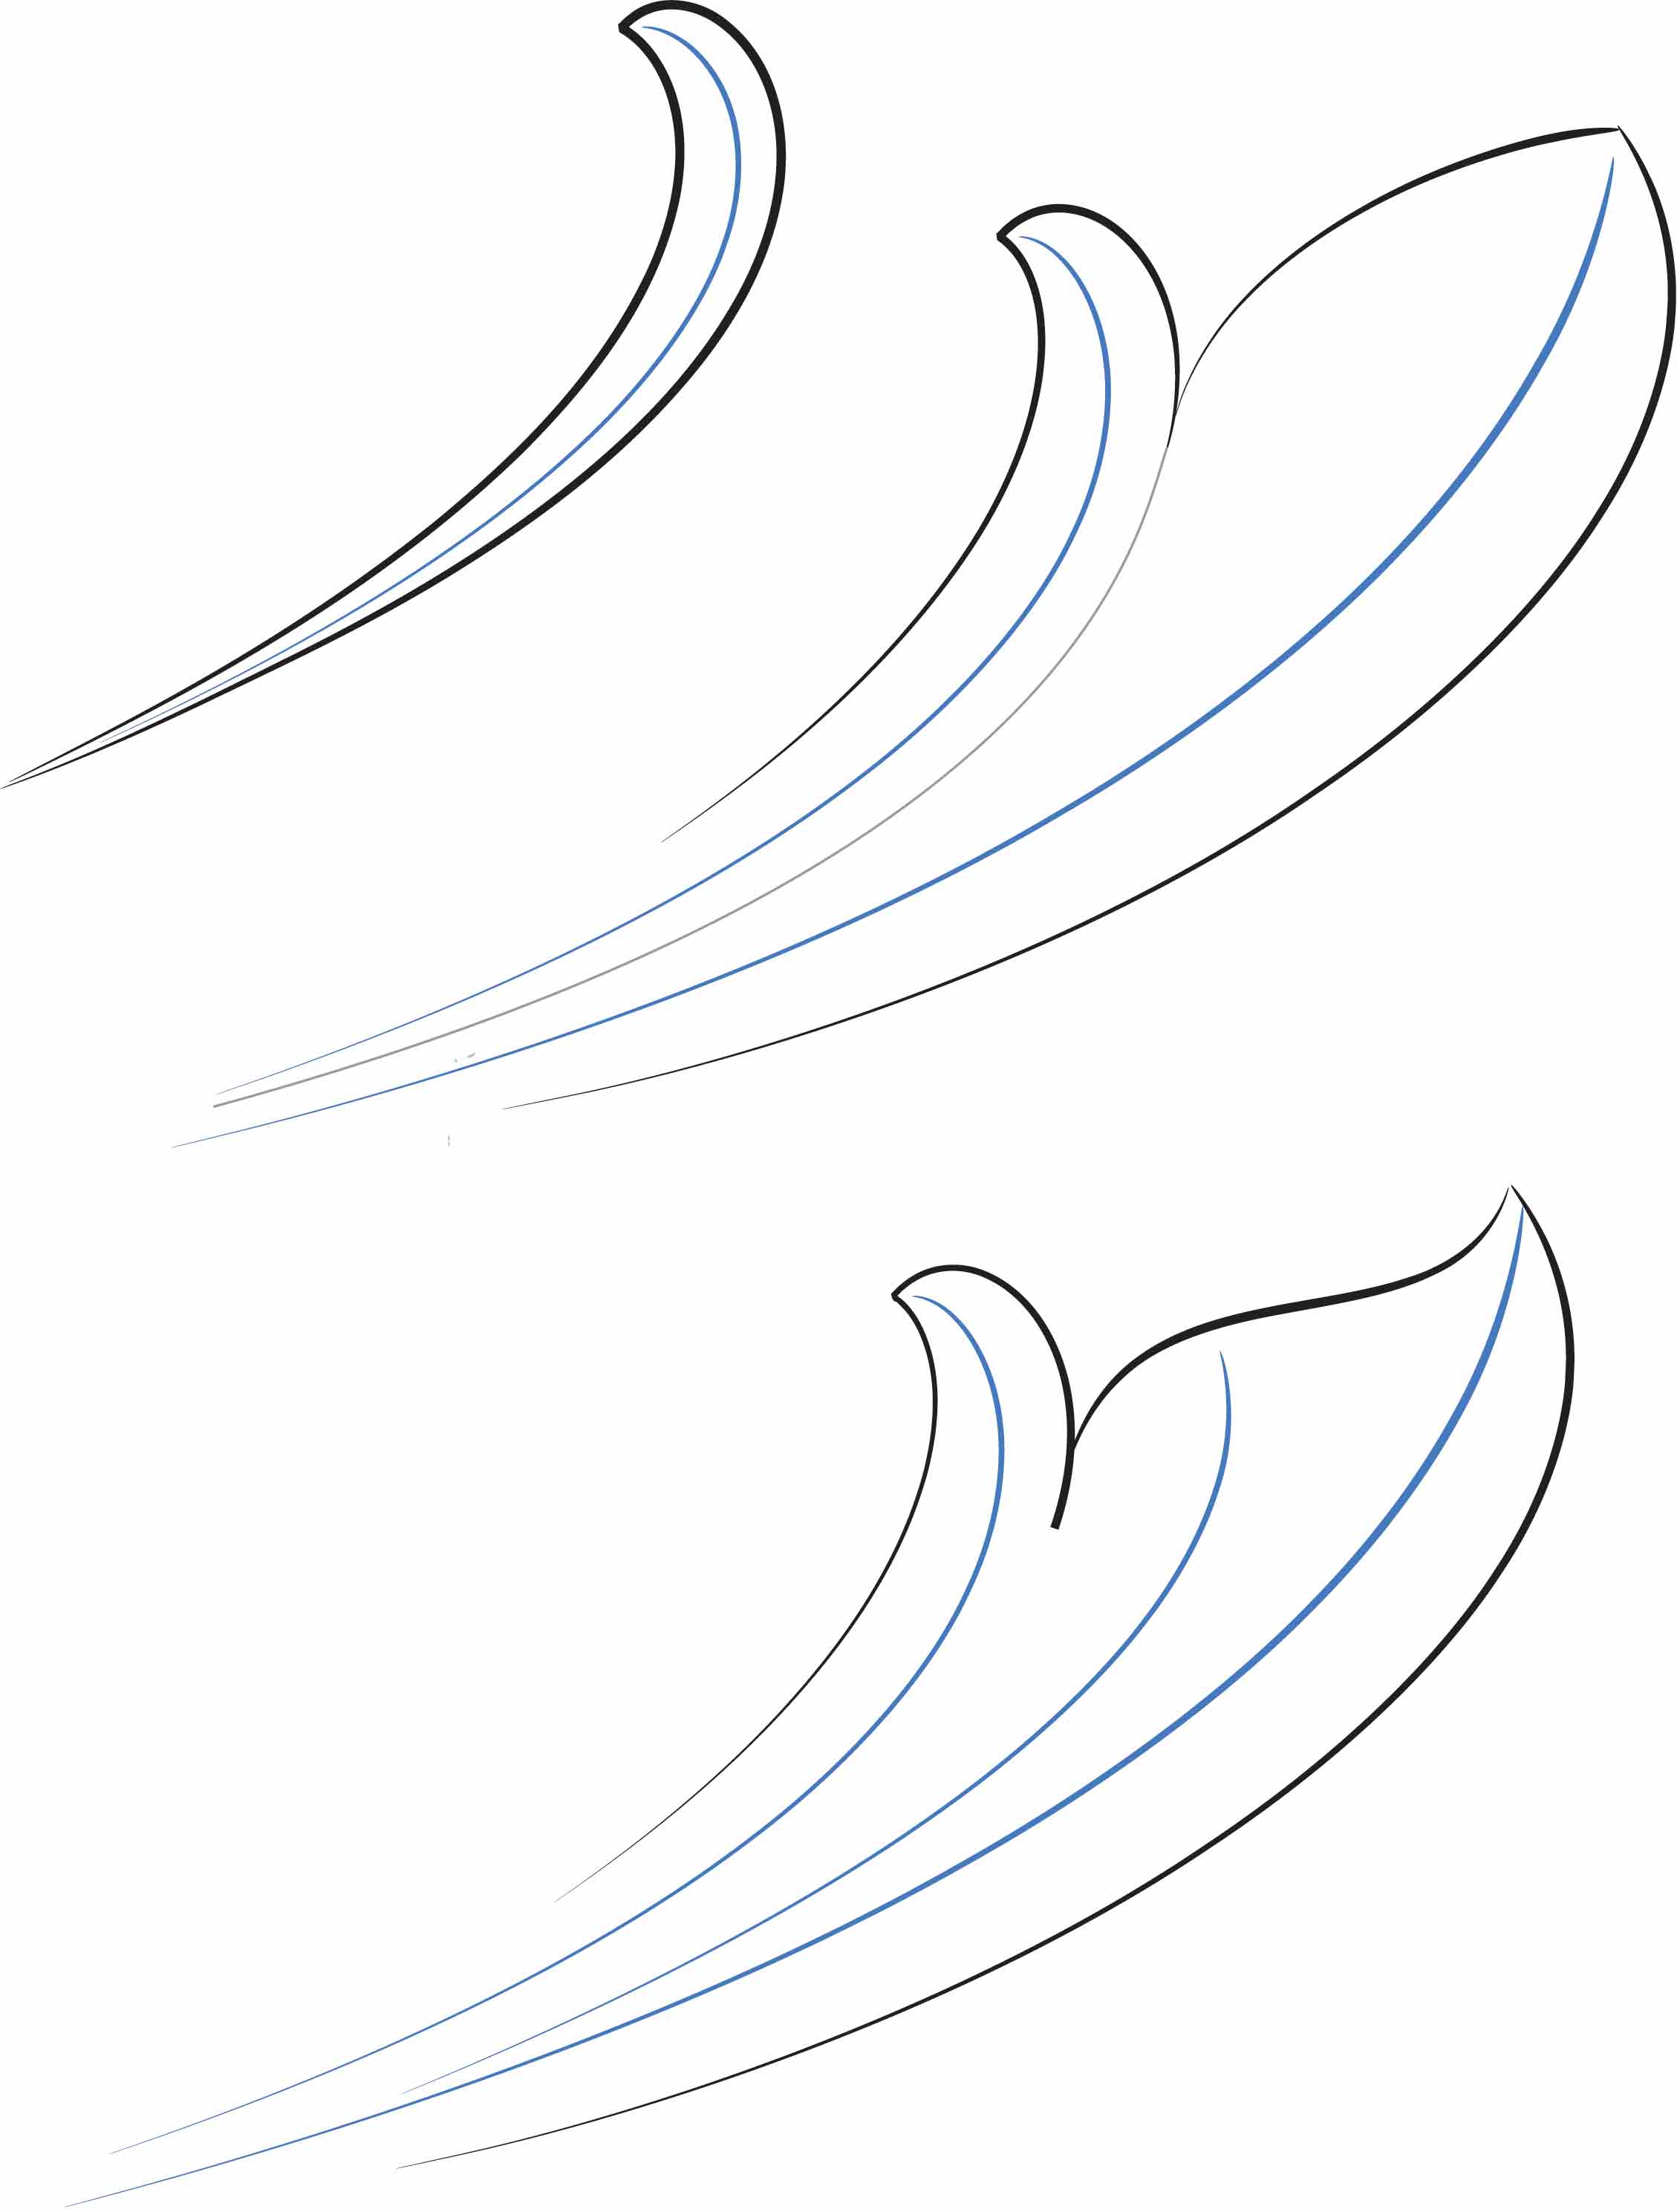
In the next, more complex leaf there
are two skeletal lines, and in the next leaf
there are three. The third line descends
from the lobe that is formed by the S curve
at the top. Knowing that the skeletal line
is there, where the swelling of this lobe is
at its fullest, we are able to keep things
balanced.
As will be seen in the layouts presented
later, most of these lines don’t get
drawn in when drawing a layout pattern.
However it is important to know that they
are there. These lines form the composition
beneath the big picture.

For the purpose of this blog post I want to make a suggestion that you get a tracing pad, print out these images and trace the lines.  -But-  When doing this I suggest that you concentrate on the dimensions of each part relative to the other parts.  Try tracing the little thumb, or simple leaf and then turn the tracing to see how many times its length will go into the the S curve at the top of the combined leaf.  Concentrate on the size and sweep of the curves in the S curve.  The curve at the tip is smaller than the curve that connects the thumb leaf.  While tracing look to see how each line relates to the skeletal lines.

The point is, it is not enough to make the right number of bumps, curves and tapers.  Each part needs to be in the right proportion to every other part.

It is perfectly acceptable to trace like this for the purpose of learning how it feels to draw certain shapes.  If you practice enough you will develop muscle memory for the shapes.  If you don’t gain muscle memory you simply won’t be able to draw floral designs.  So develop the discipline to practice when you are not trying to work on an actual project.

When you can draw the basic shapes that you want to use in your patterns, then you will be ready to take on the much more complex task of putting them together in a layout.

Leaf-development-post

Generalized Guide to Needle, Thread, and Awl Sizing for Hand Stitching

As the title states, this is a generalized guide. It is based on traditional best practices for handwork. Some of the sizes here may be difficult to find sources for. Thread comes from worldwide sources and varies in size. Different awl widths are notoriously difficult to find. Style variation will have a big effect on some of these sizing choices. At the time of this writing large stitches with wide flat braided threads are in vogue. This guide is still useful. If you proceed by choosing your stitches per inch length first, rather than the leather thickness.

Greater Dimension in Leather Tooling — Use of the Back Beveler Stamp

Why Take Less Time When You Can Take More

Why indeed?  This is a constant question that, I know, I face constantly when at work in my shop.  I'm trying to balance efficiency with vision.  It's easy to see where more could be done, so how do I decide when enough is enough?  This is a subject that I would like to engage in depth here.  For today however, I need to get back into the shop and continue work on an important deadline...

That's the dilemma.  Though I tend to come down these days more and more on the side of taking more time, the result of which is that I always have less time to do everything.  Glib I know, but that's all I have time for because I want to share this little video about a tool that I started making and using a few years ago.  The tool is not a common one, though it certainly is becoming more common all the time.  It is the Back Beveler.  The picture here shows the depth and sculptural effect that it has on the work, and this short video shows how I use it.

Please enjoy this clip, and please leave questions or comments.


Gordon

Hand Stitching, Revival of an Ancient Skill.

Recent years have seen a resurgence of interest in the simple elegance of hand stitched leather work. Mastery with needle and thread is the most fundamental skill in the leather arts. Stitching leather pieces together is a truly ancient skill, which in times past became an art form. The refinement of this form reached a remarkable level among 19th century shoe and boot makers known as Cordwainers, and references can be found for exhibition work being stitched at 64 to the inch.

"St. Crispin IX, 1873 p.181: case of prize-work for Lobb, including jockey with 60 - 1" (this may be Devlin's.)
1876 Philadelphia Centennial Exhn: Gray Bros., Syracuse, NY exhibited 'welts' made by Sandy McCarthy, including 1 pr with 64 stitches to 1" round the forepart.
Wore 2 pr spectacles to do them."   From the Crispin Colloquy.  An internet discussion forum for traditional bespoke shoemaking and allied trades.

Shoemakers use a boar bristle like a needle making what is called a "waxed end" to attach it to the thread.  The maker James Devlin wrote that when he did this kind of work he used one of his daughter’s hairs as a bristle, fine silk for thread, and that the awl blade that he used could pierce his thumb without pain and without bleeding.

If I hadn't seen so many references to this kind of work, I wouldn't believe it.  At that it is still very hard to comprehend.  I find that study of the work done by past masters is always a very good source of humility.

I want to take this opportunity to share a handout that I use in my hand stitching classes.  I'm currently working on an online course for hand stitching.  This step by step reference will be included as part of that course, along with instruction in making butt seams and the box stitch.  Courses will include video lessons, slide show presentations and downloadable content.  Please register an account here so I can notify you of upcoming coursework and check this blog for more free content that you can use and share with friends.

Below is a brief gallery of hand stitching samples.  Thanks for looking in, and I hope you have an enjoyable visit.


Subscribe

[mc4wp_form id="626"]